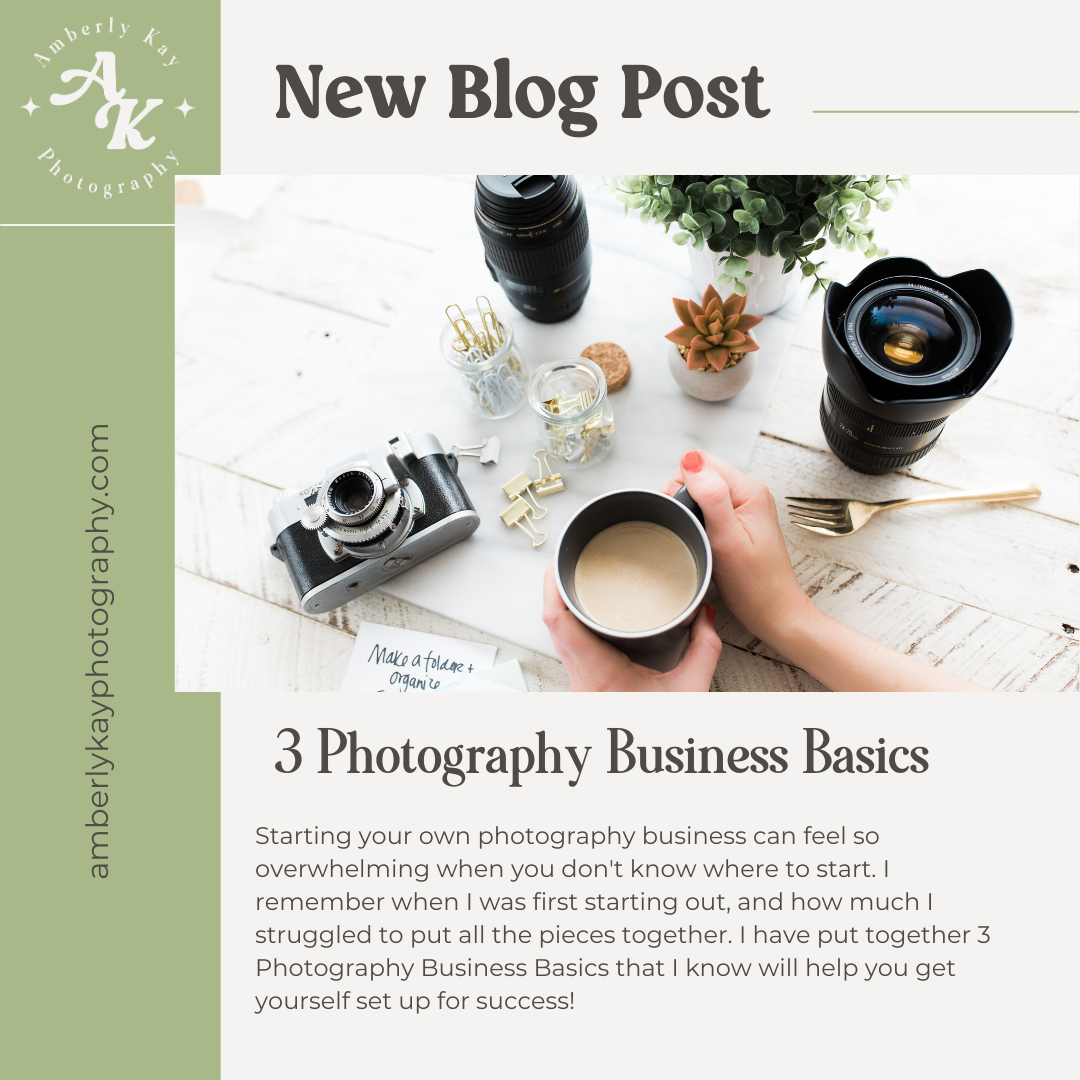
Starting your own photography business can feel so overwhelming when you don’t know where to start. I remember when I was first starting out, and how much I struggled to put all the pieces together. I have put together 3 Photography Business Basics that I know will help you get yourself set up for success!
Pricing
Understanding Pricing Basics
So many factors go into pricing yourself for success, but let’s start with the basics. You need to price yourself fairly, within market range, and to make a profit. But how do you do that!?
By taking these three pieces into account you can make sure you are pricing yourself right for success!
1. Market Price Range
This piece just takes a little bit of research. Get yourself a piece of paper and start by googling photographers in your area. Go through their pricing and write down what they charge for each package and what each package includes. This step will take you a while, but it’s super important to understand the market value of what you will be offering to have a good starting point.
Take all the numbers you have for baseline packages, exclude outliers, and calculate your average. So if I researched and found 4 photographers offering 60-minute packages with “close to the same number of images” I would take those 4 numbers and average them.
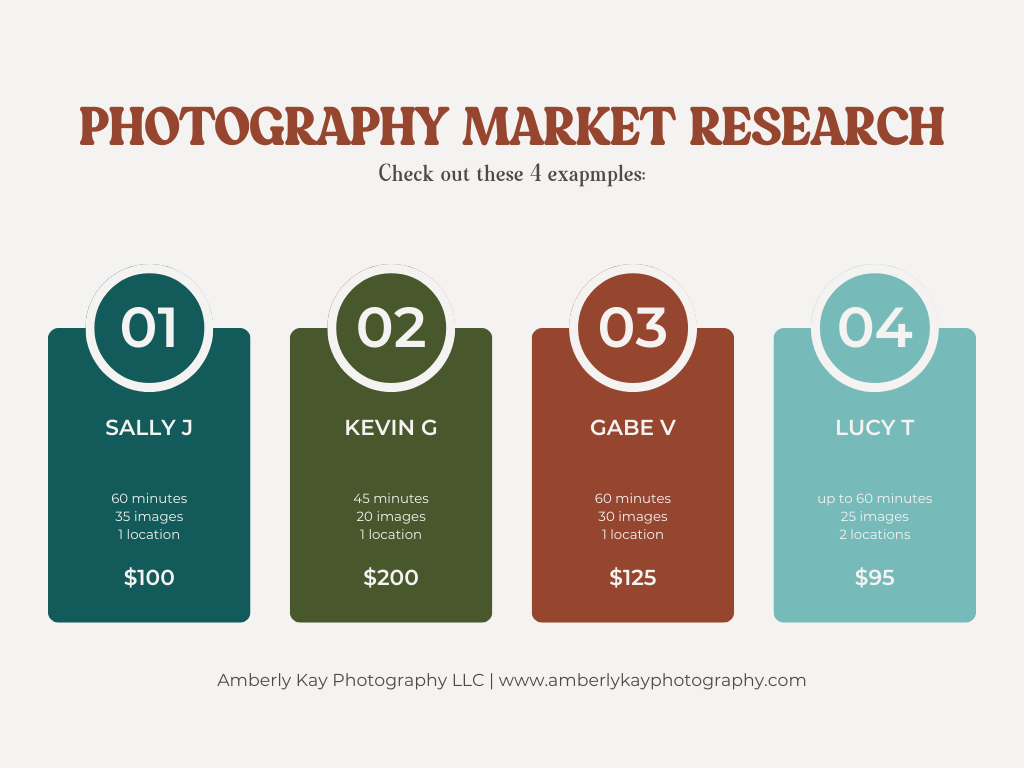
So for example, if you take the four photographers from above you can see that they all offer 60-minute packages with 25-35 images except for Kevin G. Not only does his package stand out, but his price is much higher than the others. Exclude him and average the cost of the other three by adding them together and then dividing by 3. That average comes to 107 when you round up.
Repeat this process for the highest packages. Now you have a good range for the market value in your area! Set these numbers aside for later.
2. Calculate Your CODB
CODB stands for your Cost Of Doing Business. This is a confusing concept for most, but it’s critical for calculating how to price yourself. Essentially you will factor in all of your business costs, investments, hours worked, and desired income and come to an hourly rate.
Check out this calculator to calculate your own CODB.
Now you have your CODB set that number aside with your market value range for later.
3. Pricing Yourself Fairly
Now, you have your Market Value Range and your CODB. We need to find out where to land your pricing to be fair not only to you but to your clients and the market around you. It’s not enough to just calculate your CODB because as a beginner your CODB may fall drastically lower than the market range for where you are operating. It can be harmful to the local market if you come in drastically lower than the market value, and we don’t want to do that.
For Example, if your CODB puts you at $65/hr but your market range is $100-$200/hr, coming in at $65/hr is disruptive to the market and can confuse clients.
4. Put It All Together
Obviously, this part takes a little bit of objectivism, but you need to start at that CODB factor in the local market range and determine your start price. This means looking at your skill level objectively and looking at your gear, your quality of work, client experience, etc. I recommend finding someone in the community to help you with this part. Understanding your value and what you have to offer is important with pricing.
So if your CODB is $65/hr, and the local average start is $107/hr you know you will need to fall somewhere in there for your starting price. Again taking into consideration your skill level etc. you may want to start at $85/hr or maybe you feel confident in pricing yourself at that $107/hr mark, and that’s ok. Lean on your peers to help you with this choice.
Check out our Facebook Community for support!
As you grow you will increase your prices over time. Knowing when to raise your prices can be tricky. We will cover that in another blog. Stay tuned.
Nailing Your Client Experience
You will not be known in the industry for your prices or your packages, but you will be known for your client experience. Creating a client experience worth telling others about should be your goal! I’m here to help you with that part of Photography Business Basics.
1. Your Website
Creating an online presence is the first step to attracting your ideal clients. Some photographers choose to start with just a Facebook page, and I think that’s ok for a little while, but you are going to want to make getting a real website one of your top priorities.
There are tons of web hosts to choose from and a few that specialize in photography industry web hosting. For someone just starting out I would probably recommend Pixieset. Pixieset is not only a CRM but they do offer a basic website option too!
The first thing clients will see is your website or point of contact, whether it’s a FB page or a real hosted website. either way, you want to be making a lasting impression. Showcase your best work and make it super easy for clients to reach you with some sort of “Contact” button!
I currently use Showit for my web design and hosting platform. They have a super customizable interface, and the web builder is so nice. It’s easy and user-friendly while still giving you tons of freedom. I actually create custom websites if you’d like some help creating yours!
Click here and use code: “akpfree” to get your first month free!
2. CRM
Along with your website, you will want to have some sort of CRM, that’s your Client Relationship Management system or program. Again, Pixieset offers this too! Basically what a CRM does is manages all of your clients, questionnaires, contracts, how you take payments, etc.
This system is the bridge between you and your clients. This is how you communicate with them and get all the business stuff taken care of!
While Pixieset is a great start for photographers, I have found that as I have grown and my business has also grown I was in need of something a bit more elevated. I chose to go with Dubsado! Dubsado not only manages inquiry forms but it also allows me to fully automate my workflows. From intake forms to testimony requests everything can be automated. For this ADHD girlie, that was a game-changer!
Click here to sign up for your Dubsado acct. and get 20% off your first month or year!
3. Image Delivery
The final piece of your client experience as a beginner is going to be image delivery services. You will need some way to deliver your images to your clients.
Some people opt for a simple way of doing this like using a Google drop box, or USB drives, but I always recommend using an online delivery service. Not only is it more professional, it’s actually easier and faster. Again, Pixieset comes in clutch for this too! They offer client galleries that are super easy to set up and manage and allow clients to choose favorites, download images, and even purchase prints.
There are lots of image delivery platforms to choose from, I use Pic-Time. They are a bit pricier but the client experience they offer is elevated. I love the way the galleries look, and it allows me to create slideshows and blogs right from the photo uploader! Use code : “LEBV6H” to get one month free!
The Logistics of Business Basics
The final piece to getting yourself all set up for success is the logistics of it all. Insurance, registering as a legal business, getting your contracts in order, etc! This part may seem daunting but in reality, it took me less time than all the other steps combined!
1. Form your Business
Choosing your business type and registering with your state is super easy. If you are not sure what to choose as far as business setups here’s an article to help explain it all better.
Once you decide on the structure for your business venture you will apply for registration with the legal representative for your state. If you’re in Montana here’s the link to Christi Jacobsen, Montana Sec. of State.
Filing the paperwork took me less than 30 minutes, and I just update and renew it each year.
2. Contracts
This is one of the most important parts of getting your sh*t together. So often I hear photographers say they don’t use contracts, and this is a bad idea for so many reasons. One main reason is to protect yourself. You need to outline all the expectations and set the agreement so that you and the client can both be in agreement.
This is also good for the client not only to be able to look back and read the policy, but it provides protection for them too in the event something goes array.
It’s a super unprofessional and poor business practice to be taking clients and booking sessions without a service agreement. It doesn’t have to be super detailed, but you should have them written or reviewed by a lawyer.
3. Insurance
Obtaining business insurance is the last step in Photography Business Basics. Business insurance not only protects you and your business in the event that something happens to you, or your gear, but it also protects venues and clients in a lot of cases too.
There are tons of options when choosing an insurance plan, but I just encourage you to do lots of research prior to choosing the right company and plan for you. Make sure it not only covers gear but also your clients. There are a few companies out there specifically for photographers you can find those with just a quick Google search.
Whatever you choose just get some. You don’t ever want to be in a situation to need it and not have it.
Thanks For Reading
So, there you have it the 3 Photography Business Basis that I think every photographer needs to know when starting up their business. If you would like more details on a specific area please drop a comment and let me know! I would love to help.
I hope this has been helpful and I hope you enjoyed. For more Education and Support join our Private Facebook group “Grow with Me“.
Starting your own photography business can feel so overwhelming when you don’t know where to start. I remember when I was first starting out, and how much I struggled to put all the pieces together. I have put together 3 Photography Business Basics that I know will help you get yourself set up for success!
Pricing
Understanding Pricing Basics
So many factors go into pricing yourself for success, but let’s start with the basics. You need to price yourself fairly, within market range, and to make a profit. But how do you do that!?
By taking these three pieces into account you can make sure you are pricing yourself right for success!
1. Market Price Range
This piece just takes a little bit of research. Get yourself a piece of paper and start by googling photographers in your area. Go through their pricing and write down what they charge for each package and what each package includes. This step will take you a while, but it’s super important to understand the market value of what you will be offering to have a good starting point.
Take all the numbers you have for baseline packages, exclude outliers, and calculate your average. So if I researched and found 4 photographers offering 60-minute packages with “close to the same number of images” I would take those 4 numbers and average them.
So for example, if you take the four photographers from above you can see that they all offer 60-minute packages with 25-35 images except for Kevin G. Not only does his package stand out, but his price is much higher than the others. Exclude him and average the cost of the other three by adding them together and then dividing by 3. That average comes to 107 when you round up.
Repeat this process for the highest packages. Now you have a good range for the market value in your area! Set these numbers aside for later.
2. Calculate Your CODB
CODB stands for your Cost Of Doing Business. This is a confusing concept for most, but it’s critical for calculating how to price yourself. Essentially you will factor in all of your business costs, investments, hours worked, and desired income and come to an hourly rate.
Check out this calculator to calculate your own CODB.
Now you have your CODB set that number aside with your market value range for later.
3. Pricing Yourself Fairly
Now, you have your Market Value Range and your CODB. We need to find out where to land your pricing to be fair not only to you but to your clients and the market around you. It’s not enough to just calculate your CODB because as a beginner your CODB may fall drastically lower than the market range for where you are operating. It can be harmful to the local market if you come in drastically lower than the market value, and we don’t want to do that.
For Example, if your CODB puts you at $65/hr but your market range is $100-$200/hr, coming in at $65/hr is disruptive to the market and can confuse clients.
4. Put It All Together
Obviously, this part takes a little bit of objectivism, but you need to start at that CODB factor in the local market range and determine your start price. This means looking at your skill level objectively and looking at your gear, your quality of work, client experience, etc. I recommend finding someone in the community to help you with this part. Understanding your value and what you have to offer is important with pricing.
So if your CODB is $65/hr, and the local average start is $107/hr you know you will need to fall somewhere in there for your starting price. Again taking into consideration your skill level etc. you may want to start at $85/hr or maybe you feel confident in pricing yourself at that $107/hr mark, and that’s ok. Lean on your peers to help you with this choice.
Check out our Facebook Community for support!
As you grow you will increase your prices over time. Knowing when to raise your prices can be tricky. We will cover that in another blog. Stay tuned.
Nailing Your Client Experience
You will not be known in the industry for your prices or your packages, but you will be known for your client experience. Creating a client experience worth telling others about should be your goal! I’m here to help you with that part of Photography Business Basics.
1. Your Website
Creating an online presence is the first step to attracting your ideal clients. Some photographers choose to start with just a Facebook page, and I think that’s ok for a little while, but you are going to want to make getting a real website one of your top priorities.
There are tons of web hosts to choose from and a few that specialize in photography industry web hosting. For someone just starting out I would probably recommend Pixieset. Pixieset is not only a CRM but they do offer a basic website option too!
The first thing clients will see is your website or point of contact, whether it’s a FB page or a real hosted website. either way, you want to be making a lasting impression. Showcase your best work and make it super easy for clients to reach you with some sort of “Contact” button!
I currently use Showit for my web design and hosting platform. They have a super customizable interface, and the web builder is so nice. It’s easy and user-friendly while still giving you tons of freedom. I actually create custom websites if you’d like some help creating yours!
Click here and use code: “akpfree” to get your first month free!
2. CRM
Along with your website, you will want to have some sort of CRM, that’s your Client Relationship Management system or program. Again, Pixieset offers this too! Basically what a CRM does is manages all of your clients, questionnaires, contracts, how you take payments, etc.
This system is the bridge between you and your clients. This is how you communicate with them and get all the business stuff taken care of!
While Pixieset is a great start for photographers, I have found that as I have grown and my business has also grown I was in need of something a bit more elevated. I chose to go with Dubsado! Dubsado not only manages inquiry forms but it also allows me to fully automate my workflows. From intake forms to testimony requests everything can be automated. For this ADHD girlie, that was a game-changer!
Click here to sign up for your Dubsado acct. and get 20% off your first month or year!
3. Image Delivery
The final piece of your client experience as a beginner is going to be image delivery services. You will need some way to deliver your images to your clients.
Some people opt for a simple way of doing this like using a Google drop box, or USB drives, but I always recommend using an online delivery service. Not only is it more professional, it’s actually easier and faster. Again, Pixieset comes in clutch for this too! They offer client galleries that are super easy to set up and manage and allow clients to choose favorites, download images, and even purchase prints.
There are lots of image delivery platforms to choose from, I use Pic-Time. They are a bit pricier but the client experience they offer is elevated. I love the way the galleries look, and it allows me to create slideshows and blogs right from the photo uploader! Use code : “LEBV6H” to get one month free!
The Logistics of Business Basics
The final piece to getting yourself all set up for success is the logistics of it all. Insurance, registering as a legal business, getting your contracts in order, etc! This part may seem daunting but in reality, it took me less time than all the other steps combined!
1. Form your Business
Choosing your business type and registering with your state is super easy. If you are not sure what to choose as far as business setups here’s an article to help explain it all better.
Once you decide on the structure for your business venture you will apply for registration with the legal representative for your state. If you’re in Montana here’s the link to Christi Jacobsen, Montana Sec. of State.
Filing the paperwork took me less than 30 minutes, and I just update and renew it each year.
2. Contracts
This is one of the most important parts of getting your sh*t together. So often I hear photographers say they don’t use contracts, and this is a bad idea for so many reasons. One main reason is to protect yourself. You need to outline all the expectations and set the agreement so that you and the client can both be in agreement.
This is also good for the client not only to be able to look back and read the policy, but it provides protection for them too in the event something goes array.
It’s a super unprofessional and poor business practice to be taking clients and booking sessions without a service agreement. It doesn’t have to be super detailed, but you should have them written or reviewed by a lawyer.
3. Insurance
Obtaining business insurance is the last step in Photography Business Basics. Business insurance not only protects you and your business in the event that something happens to you, or your gear, but it also protects venues and clients in a lot of cases too.
There are tons of options when choosing an insurance plan, but I just encourage you to do lots of research prior to choosing the right company and plan for you. Make sure it not only covers gear but also your clients. There are a few companies out there specifically for photographers you can find those with just a quick Google search.
Whatever you choose just get some. You don’t ever want to be in a situation to need it and not have it.
Thanks For Reading
So, there you have it the 3 Photography Business Basis that I think every photographer needs to know when starting up their business. If you would like more details on a specific area please drop a comment and let me know! I would love to help.
I hope this has been helpful and I hope you enjoyed. For more Education and Support join our Private Facebook group “Grow with Me“.


")

Comments